Inside the Box serves as a forum for individuals involved in the production of Gearbox Software content to share personal motives, methods, process and results. Gearbox Software projects are created by a diverse range of individuals spanning a spectrum of different backgrounds, interests, objectives and world views. The views and opinions expressed in this article are those of the author and do not necessarily reflect the official policy or position of Gearbox Software or any of its individual members outside of the author.
On Borderlands 2, I touched many of the missions in one way or another as Senior Designer, but I was primarily responsible for Chapter 6: Hunting the Firehawk, Chapter 12: The Once and Future Slab, and Chapters 14 & 15: Where Angels Fear to Tread.
Mind you, Paul Hellquist (Creative Director and Lead Designer) and Anthony Burch (Lead Writer) had already written and designed all of these missions on paper by the time I joined the project. But, while these were some of the most crucial parts of the plot, they had only been implemented in the most minimal way: as a series of placeholder objects in a test level that updated mission objectives when used or destroyed.
In today’s Inside the Box, I want to introduce you to Construct, a proprietary tool developed internally by Master Tools Coder Brent Friedman. The designers on Borderlands 2 used Construct to take a mission from this:
An early version of the MissionTest level. Each of the plot missions has a lane, in which are placed all of the waypoints, triggers, interactive objects, and AI pawns needed to play through the mission. Not shown: behind me is a line of every mission-giving NPC in the game.
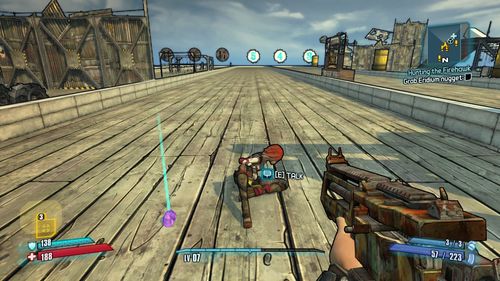
To the final results we ultimately shipped:
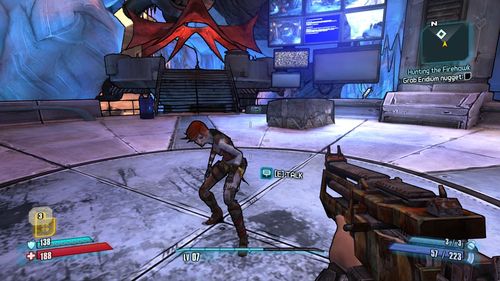
The mission state is the same, but now we’re in the real level. Lilith is playing the correct animation and the Eridium Nugget is in its proper location inside a strong box.
Construct runs seamlessly inside of UnrealEd, the editor that Unreal Engine 3 developers use to build their games. It might sound a little dry, but I absolutely love this tool. I’m hoping that this brief description will help you gain a little better understanding of how our missions work and why they’re structured the way they are. Construct had an incredible impact on the development of Borderlands 2, because the designers used it to implement literally every asset in the game that does anything.
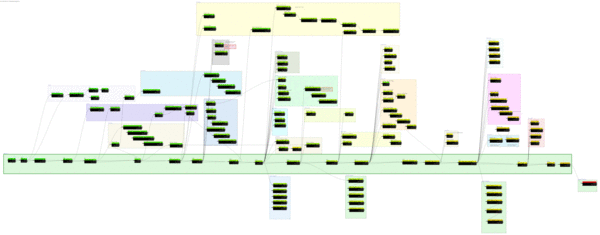
This article focuses specifically on the Mission Editor subsystem, a major component of Construct. When I open the Mission Editor in UnrealEd, I’m presented with the Global Mission Sequence, which looks like this for the main game:
Quite a lot to take in, isn’t it? The Global Mission Sequence is a flowchart representing all of the missions in the game and their relationships to each other. Each of the small black boxes is a mission, and the lines between them indicate that the completion of one mission unlocks another. Each of the big colored boxes represents an area of the game, like Sanctuary or The Dust. This was mainly done for organizational purposes, so that a designer could find a specific mission more easily when he needed to. The long green box near the bottom represents the main plot missions, starting on the left with My First Gun and proceeding sequentially all the way to The Talon Of God on the far right. Everything else is a side mission, and as you can see, most of those were unlocked based on the player’s progress in the main plot line.
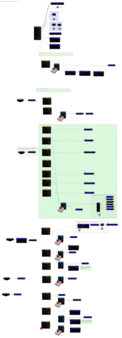
If I double click any mission in the global sequence, it takes me to the Objective Sequence for that mission. For example, here’s the Objective Sequence for Hunting the Firehawk:
As you can see, Hunting the Firehawk is fairly long and detailed, though it’s actually pretty simple as plot missions go. Every mission, at its core, consists of a series of Objectives and Objective Sets. In the editor, Objectives appear as boxes with the light blue label on top. Each Objective refers to a simple action that the player must carry out, like touching a waypoint, killing an enemy, using a switch, or picking up an item. An Objective Set shows up in the editor as a box with a brown label at the top, and each of these sets points to a maximum of five Objectives. Only one Objective Set can be active at a time, and whichever set is currently active determines the list of Objectives which will appear on the HUD. That’s why you’ll never see a mission in Borderlands 2 with more than five Objectives active at a time.
Every time a new level is loaded in Borderlands 2, the Mission System parses all of the missions in the game and checks the state of that mission. Which Objectives and Objective Sets are complete? Which are currently active? Which haven’t been started yet? Depending on this state, the mission can alter the level that was just loaded. For example, this bit of logic appears near the top of the Objective Sequence pictured above:
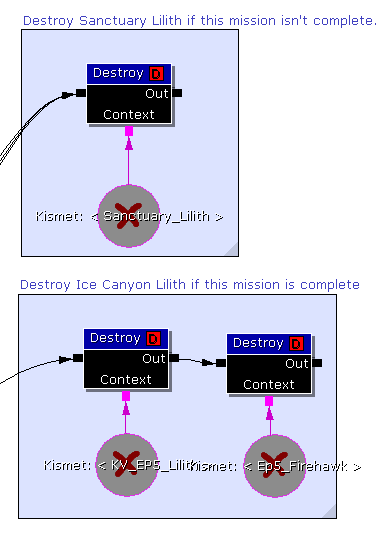
If the level just loaded was Sanctuary, but Hunting the Firehawk isn’t yet complete, then the Lilith that lives in Sanctuary is destroyed. This is because even though her Pawn is placed in the Sanctuary level, the story says she isn’t supposed to be there yet. Likewise, if the level just loaded was Frostburn Canyon, but this mission is complete (i.e. the story says she’s moved to Sanctuary), then the Lilith in Frostburn Canyon is destroyed. Don’t worry, I’m told the process is humane and she doesn’t feel a thing.
Every mission changes various levels when they’re loaded, depending on that mission’s state. So, even though the level data never changes on the disk, we can still provide players with the satisfaction of feeling the world change once mission objectives are completed, even if they leave the level and come back, or shut the game down and return later.
The black boxes with dark blue labels in the Objective Sequence are Behaviors. Simply put, Behaviors tell the game to do stuff. You’ve already seen the Destroy behavior used above, which tells the game to destroy the specified object. Since Hunting the Firehawk is a mission that consists mostly of touching waypoints and hearing ECHO messages, you might have also noticed a fewTrigger Dialog Event Behaviors in the Objective Sequence. Trigger Dialog Event tells the Dialog System to make a character say something. That system is pretty cool, because it makes the character speak the line in the world if the player is close by, but makes the line play through the ECHO system if the player is far away or if the speaking character doesn’t exist in the current level. This way, we know that the player will never miss mission critical dialog, hopefully saving them from being confused or lost about what to do next.
Mission Remote Event is another frequently-used behavior, which lets the mission talk to the level via Kismet, the Unreal Engine’s level scripting tool. If a door needs to open, or an NPC needs to walk somewhere, or an object needs to explode, then we can cause that to happen by triggering aRemote Event in Kismet. Likewise, Kismet can trigger events inside the mission, causing Objectives to update or Objective Sets to advance based on what the player is doing.
Finally, I’ll touch briefly on Interactive Objects and Pawns. A Pawn is typically an NPC or enemy that needs to be able to navigate the world, or to engage in combat. An Interactive Object is a dynamic object that doesn’t need to do either of those things, like a chest, a vending machine, or a switch. Both of these object types can be set up with something called Behavior Sequences, which can turn on a waypoint for the object or specify how it will respond when used, damaged, touched, or whatever. These Behavior Sequences can be activated or deactivated depending on mission state.
For example, here’s the list of Lilith’s Behavior Sequences used in Hunting the Firehawk:
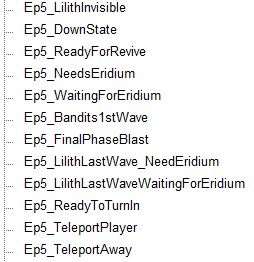
Ep5_LilithInvisible makes Lilith invisible and completely non-interactive until the player touches a waypoint near her chamber. Ep5_ReadyForRevive is the active sequence right after her intro, which causes her to sit on the floor and wait for the player to revive her. Ep5_WaitingForEridium tells her to play the “hold your hand out” animation and wait for the player to give her Eridium. In all cases, Lilith enters the Behavior Sequence when the mission reaches a certain state, and then advances the mission state when the player interacts with her in the correct way.
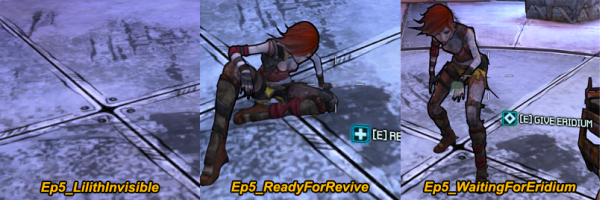
How Lilith appears and behaves during some of her Behavior Sequences.
As a fun side note, did you notice how the content names indicate that Hunting the Firehawk was originally Episode 5, and not Chapter 6 like it was when we shipped? We try never to enumerate content while developing a game, but sometimes it’s hard to avoid. Missions get added, or cut, or reordered, but we’re so used to referring to the mission as “Episode 5” that changing the name of the data would cause a lot of internal confusion. If I were to talk about this mission with Paul or Anthony today, we would still refer to it as “Episode 5”, even though the rest of the world knows it as “Chapter 6”.
I could probably go on for days about the mission tools, but I don’t want to put everybody to sleep! I’m hoping that this brief overview provided you with a little more insight into how we developed our missions. Thanks for reading!
If you have any feedback on the articles or what you want to see here on Inside the Box, please let us know at [email protected] or hit up our forums.


